Sunday, March 24, 2013

PTI Make It Monday Challenge

 
This week's Make It Monday is Inked Backgrounds.  I used French Script background stamp from Stampin' Up,(gotta get some background stamps from Papertrey!) It was stamped in Versamark and embossed with clear embossing powder.  Then I rubbed Kraft ink on with a sponge.  The inked background is mounted on a piece of raspberry fizz cardstock. 

 
I stamped the roses from Sweet Life stamp set in berry sorbet, raspberry fizz and pure poppy.  The leaves are stamped in simply chartreuse and ripe avocado.  The sentiment is from Birthday Basics set and was stamped in raspberry fizz. 
 
I hope you like my challenge card for this week!


Sunday, February 10, 2013

Paper Purse Tutorial

 
A few people at my local Stamp Club have requested directions on the paper purses that I brought to share last Tuesday.  So, I figured I would update my blog with instructions and pictures.  I cannot take credit for the design, it was something I ran across on Splitcoast Stampers.  Can't seem to find the original website. 

I will be making a different design than pictured above and using patterned paper instead of stamping.  My lighting isn't great and the green didn't show up very well for a tutorial.  So, sorry for the bad pictures!

Supplies
One 12” x 3 ½” strip of cardstock or heavy weight patterned paper
Two 4” x 3” pieces of patterned paper
Strong tape
Scoring tool
Ribbon or twine for handle
Hole punch
Velcro
Embellishments

Instructions
 

Step 1
Score the 12” x 3 ½” piece of cardstock at 3 ½”, 5 ½”, and 9 ¼”

Step 2
Score the 4” x 3” strips at ½” intervals and then fan fold them.  Start with the pattern up and with a mountain fold.  

Step 3
Add sticky tape to the four sides of the folded pieces.  

 
Step 4
Position your 12” x 3 ½” piece of paper as pictured above (This is upside down from the way it was scored and how I usually do it.  This will be the back panel of the purse). Adhere the fan folded pieces close to the fold. Make sure that the pattern is facing outwards. 


Step 5
Fold over to the right and adhere to the front panel of the purse.  Make sure you know which side is the front before you stick it down so you are sure that it is the right way.  Repeat for the other side.


Step 6
Punch two holes in the back just under the score line.   Thread in ribbon, twine or whatever else you are using for your handle.  Tie a knot to secure.


Step 7
Embellish with patterned paper, flowers, button, ribbon, beads, jewels - whatever you like!


 Step 8
Add velcro to the inside so that it will stay closed. Do this last because you might want to punch or add ribbon or other embellishments.  The mini velcro size works the best. If you only have the regular size velcro, cut them in half or fourths because it will stick too hard and possibly rip your paper. 

You're done!


Here are a few of the ones that I made for the charity event.  I have about 30 completed so far.  I used a combination of patterned paper and cardstock to make up the 12" x 3 1/2" piece.  Then when it is folded, the front panel and front flap are different colors or patterns.

I hope you enjoy making these paper purses.  Let me know if you have any questions on the tutorial.


Monday, September 3, 2012

MTME Pretty Patterns Sketch #70

Hi and welcome to my blog!   It has been a while since I have had a chance to do the pretty patterns sketch challenge.  You can find the sketch here.  I have been able to combine this one with another challenge for my local stamp club.  I have two cards to feature today.  So, on to the first... 


I stamped one of the flowers and borders from Plant a Little Love from Just Rite Stampers and colored the flowers with Spectrum markers.  I have been having a lot of trouble using these markers without them bleeding outside the lines.  But with these flowers it was a little easier to control because they are large.  I still need some practice and I don't think they will ever come close to what you can do with copics.   So, why did I opt for the Spectrums, you may ask?  To me, the copics are too overwhelming with the hundreds (maybe thousands by now?!) of colors that I just wouldn't know what to do with.  And of course the price is a big factor.  Maybe I'll change my mind someday and just go for it!  But until then I have to practice more with the spectrum markers that I already have.  Now, back to the card...

The flowers and leaves were cut out and mounted on a white circle that was embossed with little dots and then mounted onto the stamped border.  I added some distressed  Stickles in Tea Dye to the middle of the flowers and then tiny little dots around the border.  And all of this was mounted on a label that was cutout using the Silhouette die cut machine. 
I used the Blooming with Elegance digital paper from My Time Made Easy as the background with a teal border on the left side.  The white trellis is a border punch by EK Success.  A ribbon, bow and three flower brads finish off the design. 
 
For my local stamp club, our challenge was to use the same image to make two cards with totally different looks, styles, themes or colors.   Here is my second card using the same flower image from Just Rite Stampers.
 
 
I used the Spectrum markers again, but in the pink hues and with a different border.  I mounted it onto embossed green background with lace, ribbon and pink and white bakers twine. What card would be complete without a butterfly?  I added a line of Distressed Stickles in Antique Linen to the middle of the butterfly and some Cotton Candy Stickles around the border for some extra sparkle.    
 I hope you have enjoyed my projects today!
 
Happy Stamping,
 

Thursday, July 19, 2012

PTI Make It Monday #75

This week's Papertrey challenge is 'Roll the Dice Challenge'.  I was hesitant to try it, but I'm glad I did.  This was a hard one, but I pulled through and I like how it turned out.

So, this is what I got:
Orientation: Vertical
Layout:  #5
Stamp Image:  Tea for Two
Sentiments/Supporting:  Mat Stack 2
Color Combo:  Red, Gray, Black and White
Embellishments:  Glitter


I used one of the corner stamps from Mat Stack 2 to create a damask look in black on gray cardstock.  Then used the same corner stamp on the coordinating die cut. 

The teapot is from Tea for Two set and was stamped in Pure Poppy and outlined in black.  I added a punched flower in gray for a little more color.   It is a little hard to tell from the picture, but the leaves were coated in glitter glue, as well as the center of the flower.  Then I added little dots of glitter in the centers of the corner stamps that are behind the teapot and on the damask design. 

The sentiment is from Tea for Two and is stamped in black and red.  It is mounted on a piece of red cardstock and backed by a piece of black paper that was punched using a Martha Stewart border punch.
I enjoyed this challenge, even though at first I thought there was no way I was going to be able to come up with anything with the supplies and colors that I 'rolled'.  

Until next time, happy stamping!

Sunday, June 24, 2012

Make It Monday #71: Bordered Sentiments

Welcome to my blog!  I have finally finished making this week's Make It Monday challenge.  I usually just make it in at the last minute!  The challege is to create bordered sentiments using the masking technique.  It is a rather simple challenge, but I had a lot of trouble with the border that I choose to use.  It is not one of my best cards because there are some mistakes on it (whoops!).  But I did the stamping three times, but ran out of time to try it again.


I used the sentiment from Big Favorites #12 and the Guide Lines set from Papertrey.   Inside the blue lines was masked off so that the background was not stamped within the lines.  Each green and blue medallions was individually stamped to create the background.  The edges were softened with some lighter blue to give it a litte more depth. 


I added some liquid pearls to the center of the green medallions and added a simple knotted ribbon.  I like the overall effect of the card, but unfortunately I ran out of time to make it perfect!

Thanks for looking and have a great day!


Sunday, June 3, 2012

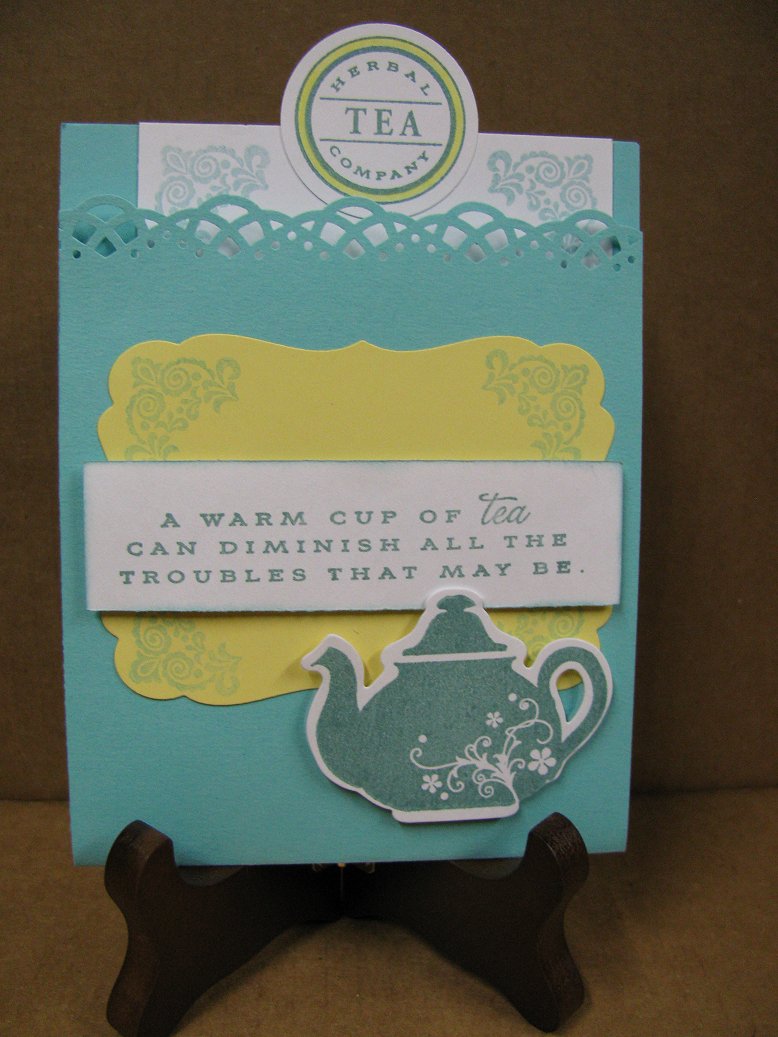
Papertrey's Make It Monday #68: Pocket Cards

I have seen many tutorials for pocket cards and have longed to make one.   This one from Papertrey is the simplest I've seen, but it does the job.  I am always posting on the last day and at the last minute, and sometimes have half a card started that doesn't get in on time.  Good intentions don't always make the cutoff!  But, I had some extra time this week and was able to finish in time. 

I thought it would be fun to make a get well card that contains something special to help the reciepient feel better.  Here is what I came up with. 


I used the Tea for Two set and a corner stamps from Mat Stack 2.  The yellow label is from Spellbinders (Label #17). 


The pocket contains some herbal tea and a get well sentiment.  I think anyone who is sick will welcome some warm tea to help them feel better faster!

I have decided to demo this card at my local stamp club this week.  So, I guess I better get to work cutting paper and getting the supples together!


Wednesday, May 16, 2012

Pretty Palette Challenge #60

I finally had time to finished a card for the My Time Made Easy palette challenge.   This week the challenge colors are orange, aqua and kraft.  I decided to use my new stamps from Just Rite.  Sorry there are no MTME supplies used this time.  My printer is on the fritz again.  It isn't that old, but I have had so many problems with it, that I think it is time to go buy a new one.  I'm dying use some of the wonderful digital papers from MTME!  

So, on to my card... I stamped the flower and colored it with prisma color pencils.  I tried to get the shading down, but I still need some practice.  The flower was cut out and mounted on agua paper with pop dots to give it a little dimension.

 I put two label dies of different shapes together to make the orange background. I like how it turned out. It is fun to put the dies together and you get all kinds of interesting shapes.  The stripes were stamped on white paper in aqua ink using a background stamp.  A piece of twine was added to give a little bit of texture to the card. 
I decided to add a 'Thinking of You' sentiment since most of the cards I have been making will be sent to Operation Write Home (visit their website for more information)  But that means I cannot use any glitter, which I love to use!  Oh, well, it's for a good cause.   


The card needed a little more orange, so three flower brads were added.  I have been trying to use the 'rule of three', which means you have three instances of each of the colors.  Got three oranges and three aquas, but only two kraft.  But I figure that the cardstock,which is the largest space on the card, makes up for the missing piece. 

Let me know what you think.  I hope you enjoyed my project!
 

Thursday, April 26, 2012

MTME Palette #57

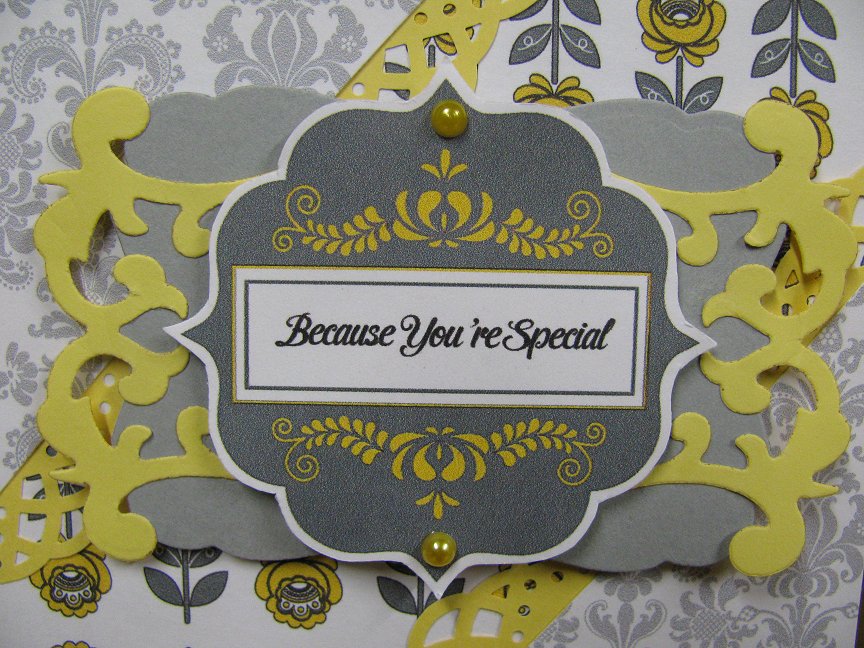
Good afternoon, ladies!  It's been a while since I've had time to make any cards.  Things have been busy around here lately.  I was excited to see the Pretty Palette challenge colors for this week.  The colors are daffodil, white and dark gray.  These were chosen from the Spring Abound digital paper pack, which I just love!  So, here is my take on the colors using the new digital paper and also the matching digital stamps from the Fine Finish set.


I added a lacy border in yellow using a Martha Stewart border punch and used the Spellbinders Labels 17 in gray and Fancy Tags 3 in yellow.  For some added embellishment, some yellow and silver were added.


I hope you enjoyed my project today! 


Tuesday, March 27, 2012

MTME Pattern Sketch #53


Welcome to my blog!  I have a card to share today that was made for the My Time Made Easy sketch challenge.   This one was a lot of fun matching the patterned paper and coming up with something to add to the four corners.  I don't know if you are like me or not, but I stress out trying to find the right 'bling' to add to my cards.  Sometimes I spend hours trying to find just the right button.  And then go back to what I originally picked out!  Well, that is all the fun of it, right?


So, this is what I came up with. I think it looks pretty in pink.  Nice for spring.  I used patterned paper and the Bold Botanicals stamp set from MTME.  I just love that set.  The flowers are so pretty!  The corners are buttons that I added a flower brad to.  I wanted to use both the pink and green but didn't want it to be too bulky or too big.  So, I decided to layer them.  Gives it a slightly different look. 


I stamped the flower in green then colored with markers. Then overlayed the markers with Prisma colored pencils. It gives it little shine and some extra dimension to the flower and leaves. Maybe you can see it better in the close-up.  The flower was stamped on Labels 4 die and the edges inked with pink, then layered on the Labels 17 die.  To get the green border, I die cut the label and left it in the die.  Used a little bit of tape on the back to keep it in place.  Then used the lime green to ink around the border.  When you take the label out of the die, you have a white border around the edge.  

Enjoy your day!

Ivette

Sunday, March 25, 2012

Papertrey March Blog Hop Challenge

Good day to everyone!  Glad you could join me today for my very first Papertrey Blog Hop.  I'm excited to be partcipating.  The challenge: to create a card based on the inspirational photo below. What a pretty spring combination. The weather here in southwestern PA has been unseasonably warm, so working on a spring project seemed to fit the mood. 


So, here is my take on the colors.  I used Make a Wish stamp set using Auqa Mist and white paper.  I used a bright yellow ribbon and buttons to create the 'sunshine' look.  The present and ribbon were stamped in Aqua Mist and cut out.  I also stamped another ribbon in yellow and cut it out.  These were mounted on the Labels Four die from Spellbinders that I edged with yellow ink.  The sentiment was stamped in Aqua Mist.   
I also created this card for my local stamp club challenge using the sketch above.   It's fun to combine challenges, makes it more challenging!

Enjoy the blog hop!

Ivette

Saturday, March 24, 2012

Pretty Palette #52

Happy Anniversary to the My Time Made Easy gang for 1 year of great palette and sketch challenges!    I have been participating when I have the time.  This time of year, I usually have the most time because there are no birthdays in April and May that I have to make cards for.  So, on to this week's challenge...

The colors for the palette challenge are rose, cherry, gray and black.  I love this color combination!  I didn't have any trouble with this one.  It just seemed to come together pretty quickly. 


I used the Make a Wish stamp set from Papertrey Ink for the birthday cake and candles.  First, I stamped the cake stand in black onto white cardstock.  Then stamped the cake in rose colored ink onto pink cardstock and cut it out.  Then I stamped the cake onto the white cardstock to help with placement of the candles.  I found a fun piece of patterned paper in my stash that just happened to be the perfect colors.  I cut a scalloped border at the bottom and added it to the top of the cake to look like icing.  Then mounted the cutout overtop of the stamped cake with some dimensionals.

The sentiment is from Think Big Favorites #12 stamp set from Papertrey Ink.  The border in grey was embossed using a Cuttlebug embossing folder, not sure of the name of it.  I like the pretty dotted scrolls along with the flowers.  Gives it a little bit of texture.

The design is set off with a border of black cardstock and mounted with dimensionals onto cherry cardstock. 

I hope you enjoyed this project!

Ivette

Sunday, March 4, 2012

PTI Make It Monday # 55

The challenge this week is creating larger frames with smaller frame stamps.  I was excited to use my new Mat Stack 2 die and stamps.  Worked perfectly with the frame background. I also just got the autumn rose ink and paper and have been dying to use them. What a gorgeous color, I love it! The new inks that Papertrey carries are wonderful.   Just have to save up to get them all.


So, I used autumn rose paper for the card base and added a paper doily for the background.  Then added a teal label that was embossed just to give some color to the background.   All the stamps used are from the Mat Stack 2 set.  I used a teal color ink for the frame, light pink for the flourishes and autumn rose for the label and sentiment. 


The buttons are just some from my stash that seemed to work nicely.  I actually found some teal colored thread that I didn't know I had to add to the teal button.  I think it looks cute with the flower button.

Supplies:
Stamps:  Mat Stack 2
Ink:  Autumn rose (PTI), teal and light pink (Studio G)
Accessories: buttons, sheer ribbon, paper doily, Label 4 die (Spellbinders)

Thanks for looking!

Ivette   

Sunday, February 26, 2012

MTME Pretty Palette #49

Welcome to my blog!  This week's colors for the MTME challenge are Saffron, Aqua, Lime and Teal.  I thought I would have a hard time with these colors, but I think it turned out ok.   Except that the pictures make the aqua color look more blue than it really is. 


The background is digital paper from MTME's Romance collection paired with a flower border punch cut from white cardstock.  The ribbon is curled under on the top and notched at the end on the bottom.  I used the mask technique to stamp the flowers on Labels 4 die so that it looks like the larger flower is in the background. The edges are sponged in aqua to soften the look. Then added some coordinating flower brads to the centers and layered on the Labels 17 die in aqua.


 The butterfly was stamped in teal and cut out.  The sentiment was stamped in teal onto white cardstock, the ends notched out and then some small lime green buttons were added to give the card a little more hint of the lime green. 

Thanks for looking!

Ivette

Saturday, February 25, 2012

Papertrey Ink February Blog Hop

Hi, here is my entry for the Papertrey Blog Hop.  It's getting close to the deadline so I have time to write very much.  The challenge:

This month, it's all about being interactive! Show us how you take your cards to the next level, whether you have received your Movers & Shakers dies, or you're just inspired to create a pop up or swinging card without them.

I made my own slider using dimensionals with buttons on the back.  For the slider, I first punched a hole on each side then cut a line to connect them on each side.  Seems to work good!   I used the Papertrey's Pond Life and Pond Life Additions. 


Thanks for looking!

Ivette